

With a new year under way the days are slowly growing longer bringing a familiar yearning to hit the water and an anxiousness of what the new season will bring. Everyone wants to capture the moment of their big catch, upload a new killer profile picture or look back on memories of summers past. Here are a few tips on creating better fishing photos.
The first choice to be made is: Am I eating this fish?
If the answer is NO, the best way to keep the fish safe and release it unharmed is to go to the shore if you are on a boat. Keep the fish in the net and the net in water until your camera is out, powered on and the photographer is in position. If you’re the photographer,quickly scan your area for the best background or perspective. If you are the angler, get in the water with the fish and hold its tail in one hand while supporting it under the belly and front fins making sure not to squeeze the gills or place your fingers inside the gill plate. Raise it with only its back and face out of the water for a 1,2,3 count while the picture is taken then submerge the fish until you’re recomposed and ready for one more 3-count photo op. Holding the fish high out of the water is not only dangerous, risking a drop, it can also get you a ticket. In some areas it can be illegal to remove the fish from the water. Let go of the fish with your front hand and release it by the tail under its own power to swim out of your hands.
If the answer is YES, then the game has changed. Bleed your fish and place it on your stringer, letting it bleed out in the current. Bleeding out in the current is faster and reduces the bear attractant and flies in the area. After 15 minutes of being on the stringer it shouldn’t flop around any more and should be completely bled out. This is the best time to take your photos. If left on the stringer or on the bank too long the fish can start to become discolored and dry. If you are eating this fish you have all the time in the world to recompose and try different angles and focus options. Practice during sockeye season can have you shooting like a pro by fall trout season.

Prep
Make sure your batteries are charged and your memory cards are ready to go the night before. The only thing worse than having your buddy looking up at you with a 50-pound king salmon in hand and you looking at a camera that won’t turn on is…being in his shoes. So let’s all do each other a favor and make sure we are charged up and ready to rock. I keep a cigarette lighter charger in each vehicle just for those times when I’m unsure and already driving to the boat launch. Looking through fishing magazines and websites can be a good way to train your eye on what angles you like, saving time when you’re in the heat of the moment. Carrying a sunglasses bag or lens cloth lets you give your lens a quick wipe before you shoot. A dirty lens can ruin a great photo and can be next to impossible to see on a small LCD screen.
Composure
Composure is the single most important aspect of taking a great photo (next to having a working battery). This is where you choose what is included and what is excluded in your photo. All great photos direct your eye to the single most important item in the frame and define the subject of the photo.

Placing your subject in the middle of the frame with a lot of background can make your images look like snapshots. Cropping can help save an otherwise mediocre picture by removing unwanted things in your frame and directing your eye to the subject.Remember, cropping your image loses pixels that
could have gone to better use.

Practice composing your frame, it will save you from having to crop your image later. When composing your image, try placing your subject off to one side of the frame. Make sure you leave eye room; if your subject is looking to the left, leave plenty of room to the left.

The “rule of thirds”
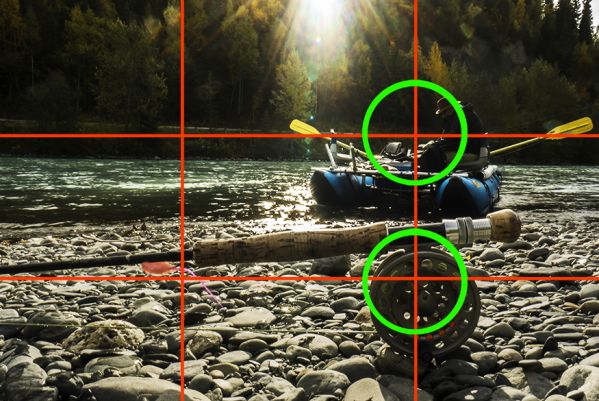
The rule of thirds is utilized by dividing your frame into a grid and placing your subject onto the intersecting lines. This is a function on most cameras that I keep on at all times as a constant reminder of the rule. As with any rule, it can be broken or just won’t apply to all your images.
Depth of field

We don’t always have control over where on the river we hook up. When you’re faced with less than desirable backgrounds such as a lawn full of junk cars or simply don’t want to showcase the 20 other guide boats pounding the same mile of river, choosing your depth of field can save your shot. Depth of field simply means what part of your field of view is in focus. On most point and shoot cameras 99% of your photos are going to be 100% in focus when in auto mode. While this can show your epic surroundings, it can also plague your photo with a snapshot look. Zooming in then composing your frame will cause your autofocus to lose some of its depth of field, letting you choose what part of your frame is sharp and what parts are soft and blurry. The closer you are to your subject and the more zoomed in you are, the less depth of field you will have and the more blur your background will have. Changing your camera’s setting to manual focus or Aperture Priority mode will give you more creative control.
Creative choices

Most of the time you will want to keep the sun at a 9 o’clock or 2 o’clock to your subject. This semi side lighting is most flattering and can give your images more depth. Camera sensors simply can’t capture what our eyes can see. Knowing this, we can make some creative choices. Shooting your subject with the evening sun at his or her back usually falls under the “don’t” category, however it can give you a nice silhouette effect. Since the camera is getting so much direct light straight into the lens it cannot expose the subject and the background correctly together. Switching to manual mode or shooting in shutter priority with a fast shutter speed can fine tune your results.
Camera settings
Shooting one photo in auto mode is a good way to see what settings the camera has chosen. Switching to manual mode will let you change your aperture and shutter speed. When you increase the shutter speed this allows less time for the image to develop. This means less light can enter your lens. This can be used to freeze motion and reduce motion blur. Changing your aperture (f number) changes the size of the hole in the lens, limiting the amount of light hitting the sensor. Aperture also controls your depth of field (or how much distance will be in focus). Keeping your aperture a small number like f2.8 or f4 will blur out the background on close ups while keeping it a larger number like f16 or f22 will can keep the background crisp for landscapes.
Use your GoPro for stills
Chances are you’re rolling video on and off during the day anyway. Take the time to shoot a few stills. The extreme wide angle of the fisheye lens can make for some creative and fun photos. Extreme fisheye lenses beg for extreme angles. Holding your GoPro slightly underwater or just above the water looking up towards the sky can give you a unique perspective while eliminating ugly backgrounds. The opposite can also apply, if your subject is low in the water, a high angle looking down can also add perspective and make the water the backdrop.
Pull a still from video!

Most cameras have a video mode and with most editing software you are able to save a single frame as a picture. Pulling a single frame can you up to 60 frames to choose from in one second of video, letting you choose the very best frame. Video mode is usually lower resolution than a still image, so this isn’t the best or sharpest image you can get, but when all else fails, it is one trick to keep up your sleeve. If you are using a GoPro, this is also a great way to get those underwater photos.
Filters
If your camera accepts screw on filters, getting a polarizing filter should be a no brainer. For those of us who swear by polarized sunglasses, our camera is often overlooked. This filter not only brings out more color detail and reduces glare from reflective surfaces, it also serves another purpose by reducing the amount of light coming into the cameras lens. While this may not be helpful in low light situations, it can make sunsets more vibrant, let you see deeper into the water, and even make your video look smoother by exposing each frame a little longer. Another bonus to using a filter is it can save your camera’s lens by acting as a shield for dust and scratches.
Perspective
Perspective and camera angle can bring dimension and point of view to your photos.

Holding your fish slightly away from your body can add a few inches in perspective but be careful not to stretch the truth out too far as it will be obvious and look unnatural.
Try out these tips and get a few more likes on those Facebook photos!
###
Phil Gilcrease is an Alaskan born and raised artist, snowboarder, father and fly fisherman. He wrote to us, “Paying forward to my children the experience, adventure and respect for all this great state has to offer. I have the deepest love for Alaska and feel blessed to live in such a magnificent place.”