
Story and photos by George Krumm
My buddy looked confused as he tried to put together the two-piece salmon rod I’d handed him. He looked at me, puzzled, and said, “I think there’s something wrong with this rod. The guides don’t line up.” Realizing he’d never seen a spiral-wrapped rod, I showed him how to put it together. “It looks goofy,” he said. I told him it looks different, and then fielded several questions he asked about why anyone would ever wrap a rod that way. I answered his questions, and by the end of the weekend he was asking where he could buy one.
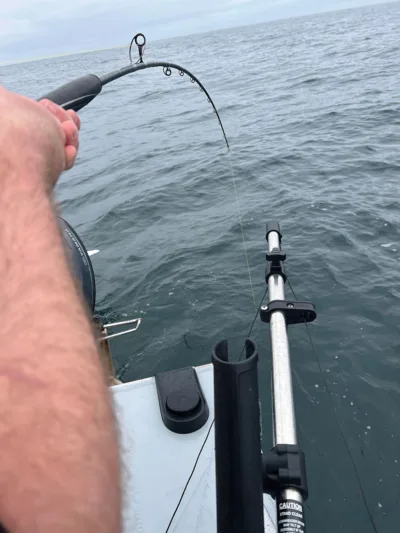
Spiral-wrapped rods, like this Batson being used for halibut jigging, are inherently stable when under load. The Rainshadow RCKJB700-325 in the photo was wrapped using the simple-spiral technique.
My answer was true back then, and for the most part, it’s still true today. “You can’t. Unless you find a custom rod builder to build you one.” Today, some manufacturers are starting to build spiral-wrapped rods. But few are building them for West Coast bottomfishing, salmon fishing and steelhead fishing. I believe the manufacturers are aware of the advantages of spiral-wrapped rods, but perhaps they don’t believe they’ll sell well due to the unconventional look of them.
Spiral-wrapped rods are not new. Rod builders have been making them for at least 100 years, but despite some strong advantages to spiral-wrapping a casting or conventional rod, they have never caught on with manufacturers, or many angling consumers. It’s a shame, but there appears to be growing interest today, fueled in part by the slow-pitch jig community, which has embraced spiral-wrapped rods to a greater degree than other market segments.
What’s a Spiral-Wrapped Rod
A spiral-wrapped rod is a conventional or baitcasting rod on which the guides direct or allow the line to travel along the bottom of the rod blank. The reel is on top of the rod blank (0 degrees of offset), as is the guide closest to the reel. After that, depending on the type of the spiral wrap, the remaining guides are offset to varying degrees, with most of them and the tip top offset 180 degrees (thus, running along the bottom of the rod blank).
Advantages and Disadvantages of Spiral-Wrapped Rods
Why would anyone want a spiral-wrapped casting or conventional rod? To answer that question, let me delve into the flaws in standard casting rods—those with all the guides and tip top all on top of the rod blank.
Have you ever seen a beginner playing a heavy fish on a conventional rod? It could be a large king, or a halibut. The angler struggles to keep the rod upright, with the reel on top. The whole rod wobbles back and forth as they struggle to wind. Sometimes, they give up trying to keep the rod upright in the “proper” orientation and let it turn upside down, and then they must crank the handle in reverse to gain line. Why do they do this?
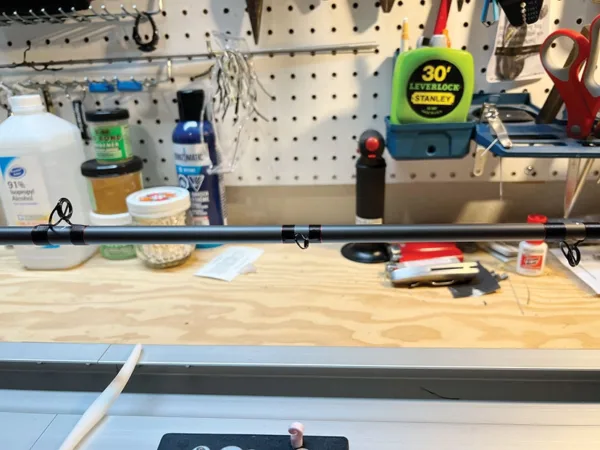
Placement of the bumper guide on the author’s Batson 1147F-M. Note that the bumper guide is offset about 95 degrees, halfway between the first guide (left; the one closest to the reel) and second guide (right).
The reason is simple. All those guides on top of the blank are elevated slightly. As a load is applied to the rod, each of those guides acts like a mini lever arm. As force is applied, those mini levers work to twist the rod towards the load. That load wants to turn the rod upside down so that the guides are on the bottom of the blank. If the angler fights this force and keeps the rod upright, you can sometimes see the rod’s tip section being twisted.
This torsional effect makes it more work to fight fish because you not only have to pull on the fish, but also work to hold the rod upright. This torsional strain on a rod blank, if severe enough, could result in blank failure (breakage).
Most of the guides and the tip top on a spiral-wrapped rod are on the bottom of the blank. This eliminates all that torsional force that tries to turn the rod upside down, and the rod becomes stable under load. With a spiral-wrapped rod, the angler no longer must fight to keep the rod upright, in the “proper” orientation. It doesn’t matter if a beginner or expert, strong person or weak person is holding the rod—it will stay properly oriented.
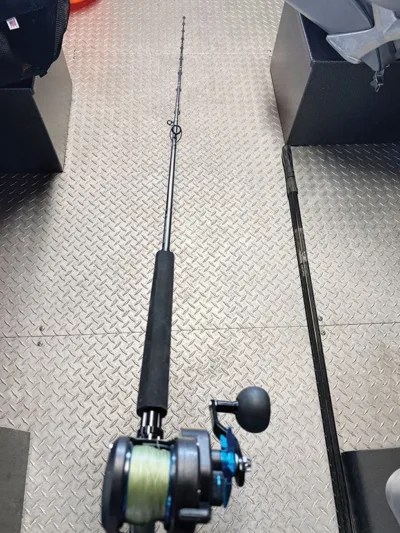
You can offset the bumper guide either to the right or to the left. It makes no difference regarding the stability of the rod under load, but for heavier rods used with non-level-wind reels, like this Rainshadow RCKJB700-112, it’s helpful to offset to the side opposite the reel handle.
If you’ve ever had a day pulling up numerous halibut, perhaps with a few big ones thrown in, you know how tired you feel at the end of it. With a spiral-wrapped rod, since you aren’t burning energy just trying to keep the rod upright, you’ll find you feel less taxed at the end of such a day. It’s much more pleasant fighting big fish with a spiral-wrapped rod.
With spiral-wrapped rods, since the line travels primarily underneath the blank, you can sometimes use fewer guides. This translates to a lighter, more responsive, more sensitive rod.
Also, since the guides and tip top are on the bottom of the blank, tip wrap (line wrapping around the tip section of your rod), rarely happens. This advantage is most noticeable when change jigging, and if you jig a lot, to jigging and backbouncing, and if you jig or backbounce a lot, spiral-wrapped rods offer a huge advantage.
The disadvantages of spiral-wrapped rods are hard to find. The main one: They look funny to people who haven’t seen them or used them. But let them use one for a while, and they’ll likely become converts. The other sometimes-claimed disadvantage is that they don’t cast as well as conventional casting rods. In my experience, that is simply not true, especially with the simple-spiral method.
Types of Spiral-Wrapped Rods
There are several different spiral-wrap methods. The original method, sometimes called the “Roberts wrap,” was patented by John Scanlan in 1909. The Roberts wrap placed the first guide (the guide closest to the reel) at 0 degrees, the second at 60 degrees, the third at 120 degrees, then the rest (including the tip top) at 180 degrees. This may be the most popular method of building a spiral-wrapped rod, though not necessarily the best, in my opinion.
The layout of guides for a simple spiral is easy—just space as you would for a normal casting rod, then flip all but the first guide (the guide closest to the reel) to the bottom of the rod, and install small, low-framed bumper guide halfway between the first and second guides, offset to 90 or 100 degrees.
Rick Forhan modified the Roberts wrap method in his “Revolver” method. He offset the first guide and the fourth guide so the inside edge of those two guides is at 0 degrees and 180 degrees, respectively. This is a minor modification, but it helps minimize line tending to stack on one side of a non-level-wind reel.
The late Ralph O’Quinn’s method deviates from the above two methods in that his method seeks to create the straightest line path from the guide closest to the reel (the first guide) to the first guide that is at 180 degrees. He did this by offsetting the first guide to the reel 45 degrees. He then placed the fifth guide at 180 degrees. Guides 2, 3 and 4 were then placed and offset to create the straightest path between the first guide and the 5th guide. O’Quinn’s method has its proponents, but even Ralph started using a different method for most of his spiral-wrapped rods in his later years. That method is the “simple spiral.”
The simple spiral is the spiral-wrap method I find most useful for the fishing I do in Alaska. It works for relatively light steelhead casting rods, to downrigger rods, mooching rods, and both light and heavy jigging rods. It also happens to be the easiest to build of all the spiral-wrap methods. The spiral-wrap method accomplishes the straight line path of the O’Quinn method but does it more elegantly and simply; that’s why Ralph switched to it.
The Simple Spiral
I didn’t originate the simple spiral rod-wrapping method. The credit goes to William “Bill” Cody. I saw his article on a CD I ordered from RodMaker Magazine many years ago called “Special Edition Guide CD,” a compilation of articles all about rod guides. It was published in 2009 and the CD can still be bought at RodMaker Magazine. Likewise, if you call RodMaker Magazine, they can sell you the back issue in which the article was originally published.
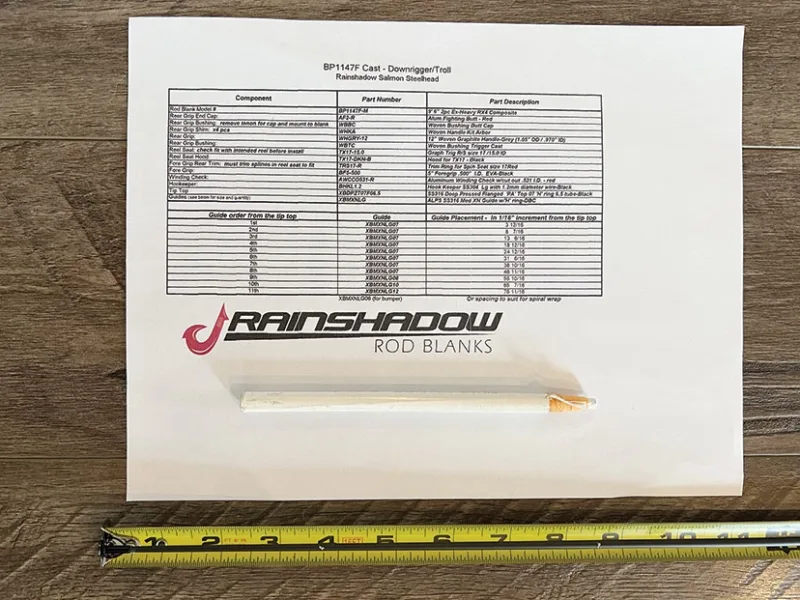
Batson has build sheets showing recommended components as well as guide spacing for many of their rod blanks. The author used the exact components from this build sheet, but added a size 6 guide (for the bumper guide) and wrapped the rod as a simple spiral instead of as a traditional casting rod.
Though I didn’t come up with the simple spiral, I immediately saw the value in the concept. Since then, I have years of experience building and using rods wrapped using the simple spiral for rockfish, lings, halibut, and salmon. One I built on—a Batson BP1266 blank—has been used backtrolling for big Kenai kings, downrigger trolling for coho and kings, mooching for coho and kings, casting bobber and bait for kings, and for pulling heavy leads and 360 flashers. This rod has been subjected to heavy use and has landed salmon from little 3-pound pinks to kings over 50 pounds.
Buying your blank and all your components from one manufacturer ensures everything fits well. The author acquired the blank and all components for his Rainshadow BP1147F-M build from Batson Enterprises, using the components shown on their build sheet.
If you’re worried about the durability of a simple spiral-wrapped rod, don’t. Having experienced the simple spiral in this multitude of scenarios, I’m 100% comfortable recommending simple spiral-wrapped rods for much of the fishing we do in Alaska. Whether backtrolling, backbouncing, downrigger trolling, casting spinners and spoons, jigging salmon or bottomfish…the simple spiral works for virtually any fishing in which you use a baitcasting or conventional reel.
One of the strongest advantages of the simple spiral, compared to other spiral methods, is that it is simple to set up, yet equally or even more effective than other spiral methods. It gets the line to the bottom of the rod blank faster than most other methods, ensuring the effects of torsion are eliminated well before the guide train reaches the thinner, more fragile sections of the rod closer to the tip top. Another major advantage is the simple spiral allows a very straight line path, which decreases line friction and results in a better-casting rod compared to other spiral methods. Finally, since the guides near the tip section are all on the bottom of the rod, it’s almost impossible for tip wrap to occur. This advantage is especially valuable for jiggers and backbouncers.
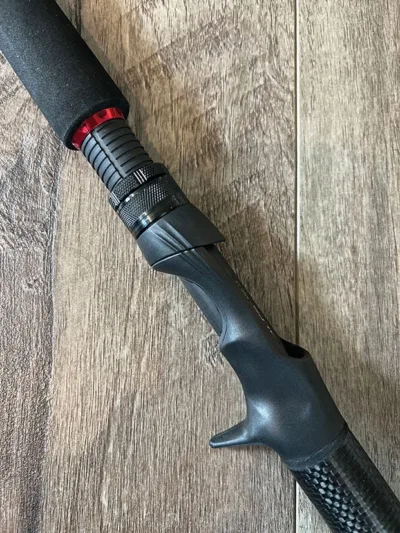
Batson’s selection of components is first-rate. Here is the handle of the author’s Rainshadow BP1147F-M. The components to build this handle were exactly what was listed on Batson’s build sheet for this blank.
To construct a simple spiral-wrapped rod, you build the handle as you would for a normal casting or conventional rod. You then place the tip top either in line with the spine, or on the straightest axis, whichever is your preference. Note that with a one-piece rod, you’ll need to glue the tip top on so that the ring is on the bottom of the blank. Then you space the guides as you would for a normal casting rod. You can use the manufacturer’s recommended spacing or create your own. The only difference is you place all but the first guide (the one closest to the reel) on the bottom of the blank. Then, place a small, low-framed guide (this is called the bumper guide) halfway between the first and the second guide, and offset it to 90 degrees (100 degrees is often better for heavier rods). That’s it!
Once the guides are taped onto the rod blank you can perform static testing as you normally would, adjusting guide spacing slightly if necessary.
You can offset the bumper guide to either the left or the right side of the blank. Which side is up to you. Some people, especially when using non-level-wind reels, like to place the bumper guide on the opposite side of the rod as the reel handle. This is helpful when using non-level-wind reels as the line will naturally want to travel towards the side the bumper is on. Having the bumper guide opposite the reel handle makes it easier to level line onto the reel spool with your non-reeling thumb.
For most light rods (think steelhead, coho, pelagic rockfish), you could use single-foot guides for all the guides that are offset 180 degrees. You could use a single-foot guide for the bumper guide on light rods, too. For the guide closest to the reel, use a double-foot guide.
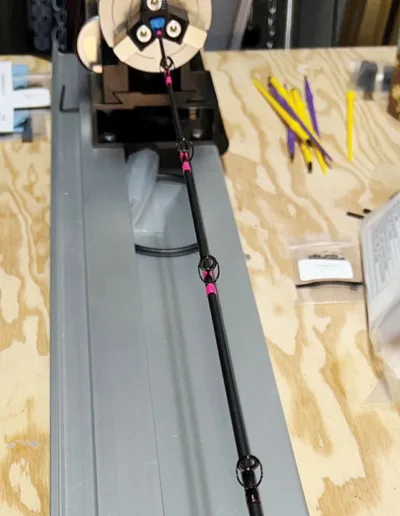
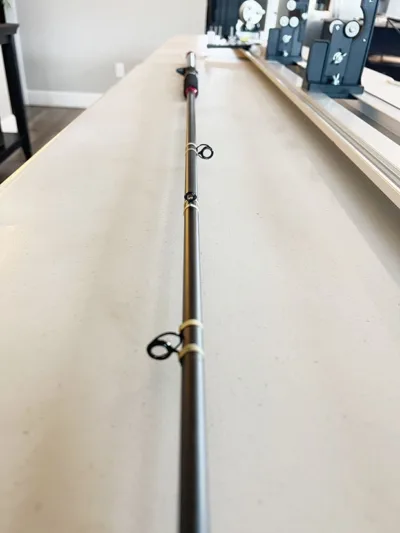
Since this Rainshadow 1147F-M will spend most of its time in a rod holder, the author chose to wrap the last few tip-section guides in hot pink to help notice a bite while trolling or backtrolling. That’s one of the beautiful things about building your own—you can do whatever you want.
For rods for kings, lings, and halibut, I prefer double-foot guides. It’s true—you could use single-foot guides on the tip section for a king rod, and I have. But I use double-foot guides on rods for kings and bigger fish for the added durability double-foot guides provide. Also, for these heavier-duty rods, it is best to offset the bumper guide to 100 degrees, rather than 90, to help keep the straightest line path through the guide train when the rod is under a heavy load.
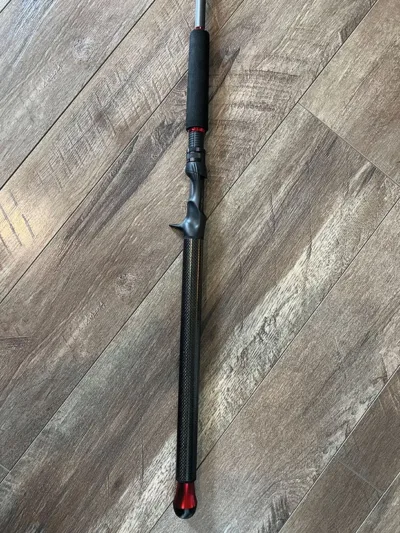
My latest simple-spiral build is a Batson Rainshadow BP1147F-M. It’s a 9’6” composite blank built with Batson’s RX4 material. Buying all the components from Batson ensured everything fit, simplifying the build. Batson’s website has build prints for each of the blanks they make, showing suggested components and guide spacing. I used Batson’s build print suggestions for this rod, to include the recommended components and guide spacing, but turned it into a simple spiral by flipping the tip top and all the guides but the first one to the bottom of the blank.
I inserted a size 6 bumper guide halfway between the first and second guides, offset to about 95 degrees. Static testing showed 95 degrees was better than 90 for this rod. Other than that, no adjustment of the guide spacing was necessary. This rod will be a fantastic rod for kings. It will shine backtrolling jumbo divers and big plugs or bait, downrigger trolling, or trolling heavy lead and 360 flashers. It may turn out to be a decent heavy mooching rod, too, but I won’t know that for sure until I try it. And I can’t wait!
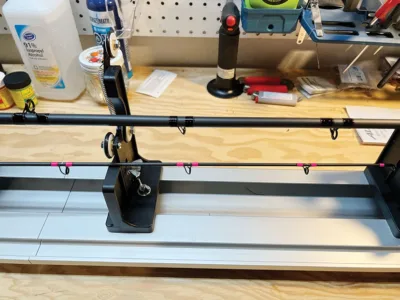
On the author’s Rainshadow 1147F-M, the transition of guides (the spiral) takes place only on the butt section. The guides on the tip section are all on the same side of the blank. The author used hot-pink thread on the last few guides of the tip section to make it more visible.
Though many anglers have never seen a spiral-wrapped rod, such rods are growing in popularity as evidenced by the numerous custom-rod builders who ONLY build casting rods in a spiral-wrapped configuration. The advantages are indisputable, and the heavier the fish you target, the more apparent the advantages of a spiral-wrapped rod become because spiral-wrapped rods are inherently stable under load. In my opinion, the simple spiral is the easiest spiral method to build. It could be that in the future, more mainstream rod manufacturers will produce spiral-wrapped rods. In the meantime, if you roll your own rods, you already have the skills necessary to build a simple spiral. If you don’t build rods, you can contact any number of reputable builders and have them build one for you. If you can get over the unconventional appearance of the simple spiral and actually try one, I bet you’ll be sold.
Check this out: Watch every step of creating a spiral wrapped rod in this how-to video.
George Krumm is the Editor for Fish Alaska and Hunt Alaska magazines. He can be reached at george@fishalaskamagazine.com.
For more reading, check out the Fish Alaska magazine past articles archive.